
navigation:

| Using Pony Clippings | |
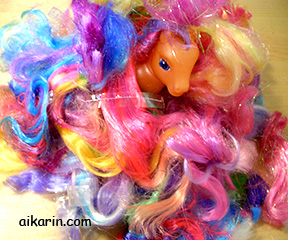
| The term
"Pony Clippings" refers to manes sheared off to make a custom
pony. When I first started customizing 3rd generation ponies, I
would just throw this stuff away. It is tedious to root with mane
hair and it ends up a little shorter than average. However, I
hated to see that lovely hair go to a waste!
The hair is collected by using a pair of sharp, tiny scissors and cutting at the mane at the base. I don't remove the plastic holder because that actually helps to keep the mane neat. |
|
|
This article will show you how
to recycle these pony clippings. They work great for ponies with
shorter hair: newborns, baby ponies, punk ponies.
If you are careful to clip the mane very close to the pony's head and tie the knot very close to one end, you will lose just a small amount of length. You could re-root an adult pony and you wouldn't notice a big difference. ^_^ <-- As you can see, pony clippings build up quickly! ^_^ |
| Prepping Pony Clippings for Manes | |
| Here is a set of pony clippings. Looks like its from a 3rd generation Bow Tie. You could also harvest hair from baity 1st generation ponies. I usually tie the hair first with some wire before snipping it. |  |
| Start off by pulling out enough for one lock of hair. That's right - one WHOLE lock. Not half a lock, since the hair is NOT going to be folded in half and effectively doubled. |  |
| Tie a knot near one end of your lock. At this point, you can use the hair to re-root in the same method as described in my Re-rooting Tutorial. |  |
| However, if you
made the knot very close to one end and it doesn't look secure, then you
can add a tiny dab of tacky glue to it. Wait until the glue is dry
before re-rooting. Other people have been known to seal the ends by melting it with a candle. I haven't tried that before and it just seems dangerous to me. Experiment at your own risk! |
|
| Using Pony Clippings to make a Tail | |
|
Here, we have a bundle of hair tied near one
end with a clear elastic band, like the ones the G3 ponies come
with.
This is enough for one baby pony tail (NOT doubled). Unless you harvested hair from the mane of a Super-Long-Haired pony, the new tail won't be long enough for an adult pony. |
 |
| The hair is on a piece of plastic wrap (Saran wrap). Apply some tacky glue to one end. |
 |
| Really work that tacky glue in, so it's completely saturated. |
 |
| Fan out the hair, so the glue gets to every part of the ends. The glued area is approximately 1/2 inch long. |
 |
| Place your fingers UNDER the plastic wrap (so they won't get sticky) and compress the hair. |
 |
| Now, the hair should be nice and compact. |
 |
| After drying for 24 hours, the tacky glue is hard and clear. |
 |
| Use the elastic band and fold the end back on itself. This way, it will stay inside the pony. (Some people say the elastic will deteriorate over the years...you could slather more glue on it if you aren't going to open the pony later. Wait until it's dry before re-assembling.) |
 |
 Tada! Now, your baby pony is happy again! |
|
|
|
|

Return to the Custom Tips & Tutorials Page