navigation:
|
|
|
| Introduction: | |
| Now,
why would anyone want to remove a hoof magnet from a 3rd generation
pony? After all, they allow the new ponies to work with all of those
wonderful new playsets.
Well...certain procedures may damage the plastic covering, such as baking the pony or using acetone to remove glue traces. Acetone will dissolve the plastic covering. Baking can melt the plastic if you stick the pony to a metal surface. Some people may want to display their 3rd generation ponies on a piece of expensive and delicate electronic equipment, such as a monitor or tower. In this case, it might be possible to remove the magnet and replace the plastic cover. Disclaimer: This tutorial is provided at YOUR OWN RISK. This tutorial is NOT for children. The author of this tutorial takes no responsibility for damages or personal injury. Be sure to take the proper precautions. Remember: Safety First! |
|
| Supplies needed: | |
| 3rd
generation pony - any G3 My Little Pony will do. X-acto knife - for slicing around the magnet's covering Small or medium flat head screwdriver - for prying the magnet cover off Safety goggles - pretty self-explanatory, I should hope! |
|
| Instructions: | |
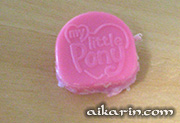
| 1.
Pony Anatomy The pink plastic with the My Little Pony logo is just a cover for the disk-shaped hoof magnet inside. The area you'll be working in is very tiny, so use caution. Put your safety glasses on before beginning. You'll look geeky for a moment, but at least you won't lose an eye. |
 |
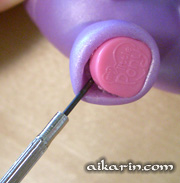
| 2.
Cutting the glue Use the X-acto knife and slip it between the pink cover and the pony's hoof. You want to cut in about 1/2" deep, all around the edge. Be VERY careful here...the glue is hard & the magnet will try to pull your x-acto blade around.
|
 |
|
REMEMBER: always cut or pry AWAY from your fingers. |
|
| 3.
Loosening the cover Use your small flat-head screwdriver & pry UNDER the cover. Try to get the area the farthest away from the surface, since you might put some dings into it. Work your way around the whole cover. |
 |
| 4.
Prying the cover off Here, I use a larger screwdriver to get some more leverage. You might need to cut a little more with the x-acto knife to get the cover off. |
 |
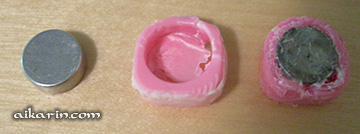
| 5.
Finished! The picture shows the hollow area where the magnet was and the back side of the magnet. This particular pony has a lot of glue on it. It might be impossible to remove the actual magnet. |
 |
| 6.
The magnet cover Here is a picture of the removed magnet & cover. It still has a lot of glue stuck to it. You can pick it off with your fingers. Don't use acetone, because it will dissolve the pink part! |
 |
| 7.
Re-installation When you're done baking/cleaning/dyeing/painting your pony, you might want to put the cover back on. Just put a dab of tacky glue around the rim & push it back in place. I'd avoid super glue, which can etch the pink plastic cover. |
|
|
Sometimes,
there won't be any glue and the magnet will pop right out. |
|
| A Link?: | |
|
|
|