
navigation:
|
|
|
| Introduction: | |
| One
of the most tedious things to a customizer must be deflocking. In my
opinion, it's ALMOST always worth it to pay more for a non-so-soft pony
than it is to deflock. My first de-flocking job took about 3
hours. And it didn't even look totally hairless. >_<
So, why a deflocking tutorial? Well, it's the only feasible way to get a rearing pose custom, such as my very own Starfall, the site's mascot. Hasbro did make non-so-soft rearing pose ponies, but they are exceedingly rare. We're talking $200+ per pony rare. No customizer in his or her right mind would tamper with one of these. The instructions below are for de-flocking ponies for customizing. Not to make a non-so-soft (NSS) version of the same pony. That takes an extremely long time, since you have to be careful not to damage the original symbols & the eyes. Disclaimer: Acetone is very dangerous. It is flammable & dangerous to your health. This tutorial is provided at YOUR OWN RISK. This tutorial is most definitely NOT for children. The author of this tutorial takes no responsibility for damages or personal injury. Be sure to take the proper precautions. Remember: Safety First! |
|
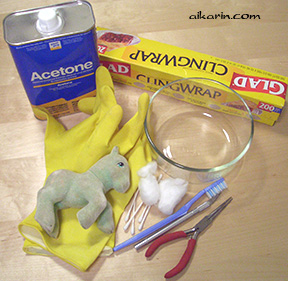
| Supplies needed: | |
| So-soft
bait pony - most likely, it's a rearing pose pony, like SS Truly,
Magic Star, or Skippity Doo. X-acto knife - for removing the pony's head and amputation. Eeek! Scissors - for
snipping the mane off. Glass bowl - for soaking the pony. Do NOT use a plastic bowl, because acetone may damage it. Plastic wrap - for covering the bowl. Cotton balls & cotton swabs - for final touches & removing symbols/eyes. Latex gloves - essential for handling the acetone-dipped pony. Soap, water, and sponge - for the final clean-up NIOSH mask - optional - I can't stress this enough, but acetone is hazardous when inhaled. Even with a NIOSH mask, you must still work outside. Goggles - optional - acetone fumes are an eye irritant. You should remove your contact lenses before starting. Wear goggles if your eyes are sensitive. |
|
| Instructions: | |
| 1. Disassembly Carefully slice around the rim of her neck approximately 1/4" deep with an X-acto knife. Don't cut straight through...otherwise it'll be hard to reassemble her! Look closely at the neck seam & try to preserve the original structures. Use the needle-nosed pliers to remove the tail. |
|
| 2.
Mane Removal (optional) Use the scissors to cut the mane at the base. Use the needle-nose pliers to remove the mane from the inside of the head. You can also leave the mane in, but the acetone will make the hair rough. For most customs, I recommend just removing it & re-rooting later. |
|
| 3.
Go Outside to a Well Ventilated Area I'm VERY serious about this. Acetone is harmful if inhaled in large quantities. It is a SOLVENT, which means it MELTS things. Like skin/lungs/brain/eyes. You need to be in a WELL VENTILATED area. Which means - go outside. You can also don your NIOSH approved mask and goggles if you want to be extra careful. Even with a NIOSH mask, you need to be outside! Also, make sure there are no open flames nearby. Acetone is extremely flammable. So, smoking and barbecues are a no-no. |
|
| 4.
Soaking Place the pony's body and head into the bowl. Wear your gloves & pour the acetone onto the pony. The pony should be completely submersed. Cover securely with a piece of plastic wrap. Let the pony soak for about 5-8 minutes. Leave the bowl outside. You can go inside & relax or something. ^_^ |
|
| 5.
Scrubbing Put your gloves & (optional) mask & goggles back on. Grab your ratty toothbrush. You're still OUTSIDE, right? Uncover the bowl & scrub the pony while she is still in the acetone. You might need to add fresh acetone if the level is too low. You might notice that the pony is completely floppy! This is okay...she will go back to normal in a few days. |
|
| 6.
Details I usually pour the nasty acetone into another container. Then, I add some fresh acetone to the glass bowl & scrub the pony again with the cotton balls/cotton swabs. This is also when I use the cotton balls to remove the symbols, and/or the eyes. I usually try to leave most of the eyes intact & use the cotton swabs to remove the fuzz around the eyelashes. The hardest areas to get completely hairless are where the legs meet the body & around the ears/muzzle. Concentrate in those areas. The pony has to be 100% hairless. If she is not, every last bit of hair will stand out like a sore thumb when she is re-painted. |
|
| 7. Clean-up When you're happy that the pony is 100% hairless, give the pony a bath in some (non-lotion) soap & water. I recommend using dish soap or something like that, which does not have moisturizers in it. This might affect the painting process. For the acetone, you can bottle it & leave it for the hazardous waste pickup. Remember to be careful when handling it, because it is flammable. Seems like a waste of acetone, but you cannot re-use it, because it has melted glue in it. |
|
|
|
|
| A Link?: | |
|
|
|


Return to Custom Tips & Tutorials Page