
navigation:
|
|
|
| Introduction: | |
| The
eyes are the most expressive part of a custom pony. So, it's
important to take your time and make sure that the eyes are painted to
your liking. Eye painting is one of my least favorite tasks, just
because it requires great concentration and patience. Don't worry,
you'll get better with practice. ^_^
Also, there is no wrong way to paint an eye. Dare to go crazy with the eyelashes. Get creative with eye swirls, embellishments, and decorations. The most important thing is to have fun! ^_^ |
|
| Supplies needed: | |
| Base
pony - any pony will do ^_^
Acetone, nail polish
remover, or Goof-Off & cotton pads/swabs - for removing the existing eye Tissue paper - used for wrapping items for shipping or gift wrap. NOT the same as tissue used to blow your nose! Thin, flexible, and translucent...it's good stuff. Pencil - for making an eye tracing Gloss varnish (optional) - for sealing eyes when they are dry |
|
| Instructions: | |
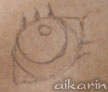
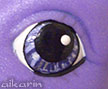
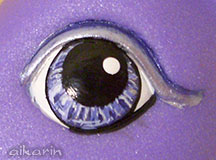
| 1.
Observe the original eye This is a G3 pony's eye. They have three top lashes and two bottom ones. Lashes and pupil are dark blue. The iris (colored ring) has a base color and a contrasting "swirl". There is a white reflection "dot" in the upper outer quadrant and a small eye symbol. This pony does not have eyeshadow. |
 |
| 2.
Trace the eye Place your tissue paper over the eye and trace gently with a pencil. Don't push too hard, otherwise the paper will tear.
|
 [Click for enlarged view] |
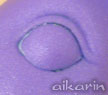
| 3.
Flip paper over and trace over back of eye design This is what it should look like. Fill in any areas that you missed. Flip it over and trace over the BACK of your design with your pencil. This will make sense in a later step. |
 |
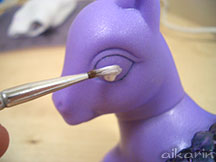
| 4.
Remove original eye Using acetone (or nail polish remover or other solvent of your choice) and your cotton pads and cotton swabs, completely remove the eye. Be careful not to smudge the paint everywhere, since it may stain light colored ponies. Also, this should be done in a WELL VENTILATED area away from any flame sources. |
 |
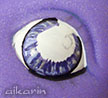
| 5.
Paint white base coat Using your medium brush, apply several layers of white paint to the eye. Wait until each layer is dry before applying another one. |
 [Click for enlarged view] |
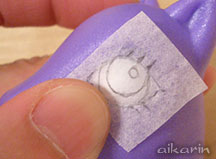
| 6.
Transfer your eye pattern Position tissue over the white part and trace over it with either a pencil or stylus. Press gently! |
 [Click for enlarged view] |
| 7.
Remove tissue paper Voila! It looks somewhat like a pony eye. ^_^ Use your pencil to fill in areas that were missed. |
 |
| 8. Paint
outer rim of iris and bottom eyeliner Using your fine tipped brush, paint outer rim in your preferred outline color. Most ponies have black or dark blue rims. Some G1 ponies have dark brown rims. Bottom eyeliner does NOT go all the way across the bottom eyelid...it's only in the lower outer quadrant! |
 |
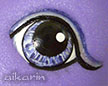
| 9. Paint
iris color Use your fine tipped brush to paint the iris in your preferred color. Be careful not to paint over the outer rim that you painted in step 8. The inner edge can be a little "messy" because you'll paint over it in step 11. |
 |
| **
10. Optional ** Iris stripes or swirls I added thin stripes to the iris here. You can add a "swirl" if you want to in this step. TIP: You want to paint both eyes at the same time, to make them as identical as possible. If you add a layer of color to one eye, make sure you do the same to the other eye, because this can show through in the final color. |
 |
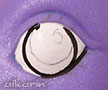
| 11.
Paint pupil and white reflection Use your medium sized brush to paint a dark circle for the pupil. After it dries, add a dab of white for the "reflection" in the upper outer quadrant. Optional: You can add an eye symbol in this step, like the pink heart in the original eye. |
 |
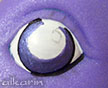
| **
12. Optional ** Eye shadow This pony has gradient upper eye shadow. To do this, paint one or two base layers in the lighter color. It is silver in this example. While the paint is still wet, use a fine tipped brush to add a line of the darker color in the crease. Use a clean brush to blend the darker color into the base color. |
 [Click for enlarged view] |
| 13. Paint
upper eyeliner This step requires a steady hand. Angle the pony's head for easy access to the upper eyelid. Make sure your brush is nice and clean. Load with your preferred eyeliner color (black in this case) and drag the brush on your palette or a piece of scrap paper. This gets rid of excess paint. Then, paint the upper eyeliner. |
 |
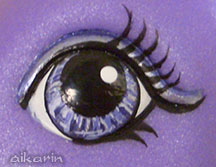
| 14.
Paint eyelashes This must be my least favorite part, LOL. Painting eyelashes is tough. Make sure your brush is clean, then load with your preferred eyelash color. I like to thin it down a little, so the brush retains its shape. Carefully paint the lash from the eyeliner OUT, using a light touch. This pony's lashes are not the same as an original G3s...I added a few extra lashes. ^_^ TIP: For ponies without a full re-paint - if you mess up a little, you can use some acetone on a cotton swab to correct the mistake. If your pony DOES have a full re-paint, I hope you saved some of the base color. Use a tiny brush to paint over the area with base color and try again. It may take several layers to cover up the mistake. |
 [Click for enlarged view] |
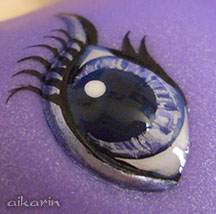
| **
15. Optional ** Clear coat For most eyes, I use a thin clear coat of glossy varnish. Eyes should be 100% dry before attempting any clear coat, otherwise they will cause your paint to run. Make sure that you're finished with the eye & don't want to make any changes. This is the "point of no return"! If you want a super glossy coat, tilt the pony's head so the eye faces up and is parallel to your table top. Put a drop of gloss varnish on the eye & spread it evenly in the recessed part. Do not move the pony until it dries completely (may take a day or two). Repeat with other side. Gloss varnish is best when applied in one coat, since extra coats won't stick to the first one! ^_^ |
|
| A Link?: | |
|
|
|

Return to Custom Tips & Tutorials Page