navigation:

| New Tail Tutorial | |
| A lot
of people have been asking "how do I make a new tail".
It's seems pretty easy to me, but then again, I've made hundreds of
tails and I've restored/cleaned hundreds of ponies. ^_^ There are MANY ways to do this...I've listed the "easiest" way here. |
|
Requirements:
|
|
| Step 1: Remove
the pony's head.
Most new style ponies with turning heads
don't require cutting. Just twist the head & use a little
brute force. ^_~ |
 |
| Step 2: Reach
into the pony with your needle nose pliers, grasp the tail, and pull it
out through the neck hole.
|
 |
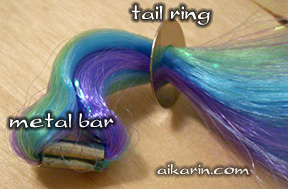
| Close-up view of
the original tail. This is the end inside the pony. The
metal bar is crimped onto the hair, keeping it in place. This part
doesn't rust often, but sometimes it will develop a green patina in G3s.
The tail ring keeps the tail from being pulled out of the pony. This part frequently rusts...almost every single G1 pony will have some degree of tail rust. |
 |
| Step 3: Cutting
hair to TWICE your desired length
Shown to the right: This 12" segment will result in a final 6" tail length, since it is folded in half at the midpoint and secured inside the pony. Below: A diagram of how I like to prep nylon hair for ponies with standard length hair. I cut each skein into three 12" segments. I find this the best way to minimize waste. ^_^ |
 |
 |
|
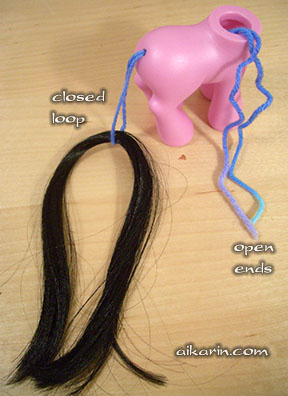
| Step 4: Inserting
the tail Insert your needle nose pliers through the INSIDE of the pony and grasp the open ends on a piece of string. The string doesn't have to be a specific length, although really short lengths are hard to work with. The string is just some acrylic yarn, so it won't attract moths or decay. |
 |
| Step 5: Loading
your hair Place the hair inside the closed loop on the outside of the pony. Tug gently on the open ends to pull the tail through to the neck opening. Don't pull too far, otherwise the tail will slip out! You want to support the hair with your other hand, so it stays nice and even. |
|
| Step 6: Tie a
knot Use your string to tie a knot in the middle of the hair. |
 |
| Step 7: Secure
the hair
Using another length of string, wind inside and outside of your loops in a figure eight pattern. It's easier than it looks and it doesn't need to be perfect. This will keep the string from slipping. |
 |
| Step 8: Finish
securing the hair Knot the string several more times to ensure a sturdy wrap. Trim off loose ends. ^_^ |
 |
| Step 9:
Repositioning the hair While holding onto the knot, pull the tip of the tail gently. Keep pulling until the knot holds the hair firmly in place. Comb, trim, and style as desired. ^_^ Tada! Your pony now has a lovely new tail. |
 |
|
|
|